 Aubora
Getting started with the Aubora beta
Aubora finds any photo in cloud storage you already own — private, on-device search, people, and a map. Nothing about your photos is uploaded to us; every model runs on your Mac. This guide gets you from download to first search.
Requirements
- macOS on Apple Silicon (M-series), recommended. An Intel (x86) build for older Macs is on the way — same features, CPU-only, without the optional GPU acceleration (CoreML), which is Apple-Silicon-only.
- One photo source: Infomaniak kDrive, pCloud, Dropbox, or a local folder.
- A beta license — free, optional to start. Without one you're on the free tier (2,000-photo
cap, limited features); a beta license is a full license for the duration of the beta,
lifting those limits. Register your email at aubora.app to get a key by email (
AUBORA-…); paste it under Settings → License (§1). No license file, no account. Beta testers get a discount on the full license at launch.
1. Quick start
- Download and open Aubora. Download the
.dmgfor your Mac from aubora.app (Apple Silicon or Intel build), drag Aubora to your Applications folder, and launch it. The first time, macOS may warn it's from outside the App Store — open System Settings → Privacy & Security, find the Aubora message near the bottom, and click Open Anyway. - Activate your beta license. Open Settings → License, paste your
AUBORA-…key into License key, and click Activate. Aubora verifies it once and binds it to this device, then runs offline; the panel shows your tier and expiry. (License lapses are covered in the FAQ.) - Connect a photo source. Pick kDrive, pCloud, Dropbox, or a local folder, and follow the per-source steps in §2.
- Let it index. Aubora reads your photos, builds the search index on your Mac, and reads each photo's GPS for the map. The first index of a large library takes a while — plan for it to run in the background, even overnight on tens of thousands of photos; after that it keeps up incrementally. A top-bar badge shows "Indexing… N%"; click it for the Library panel — discovered / processed / remaining counts, throughput, an ETA, and Pause / Resume / Cancel. You can keep working while it runs: results appear progressively (map first from GPS, then search, then People). Quit mid-scan and it resumes where it left off — the index is its own checkpoint, so nothing is redone.
- Search, browse the map, see people. Type what you remember ("red boat at sunset"), open the Map to see where photos were taken, open People for faces grouped on-device. The tabs are Gallery, Map, People, and Settings. On the free tier People is browse-only; naming, merging, and splitting people come with your beta license.
2. Connecting your storage
Aubora reads from a source you already own. It never copies your library or writes to your storage — it reads photos to index them, pulling an original only when it needs the pixels, then discarding it.
Infomaniak kDrive — API token + drive ID
kDrive connects with an API token and your drive ID (not a browser sign-in).
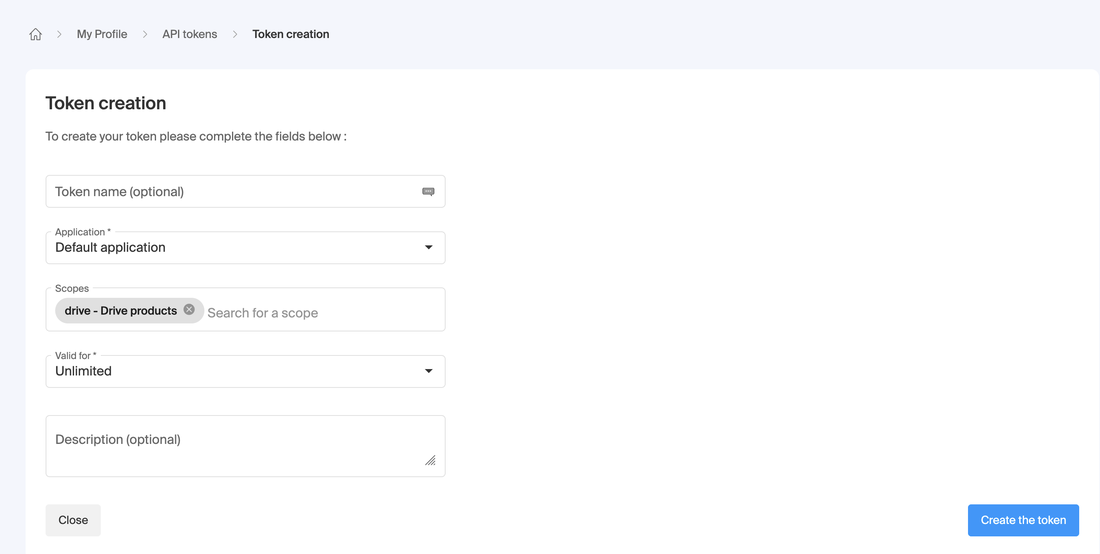
Step 1 — Create an Infomaniak API token. In the Infomaniak manager, go to My Profile → API tokens → Create a token (direct link) and set:
- Scope — add
drive – Drive products(search "drive"); that's the only one needed. Infomaniak has no read-only Drive scope, but Aubora only ever reads, and keeps the token in your macOS keychain, never on disk. - Valid for — Unlimited keeps it working indefinitely, or pick a duration if you'd prefer it to expire (you'll make a new one when it does).
- Token name and description are optional.
Then click Create the token and copy it — Infomaniak shows the value only once. (Infomaniak's own guide: support FAQ 2582.)
Step 2 — Find your drive ID. It's the number in your kDrive URL (also shown in the kDrive app). Aubora tries to auto-detect it, but if that fails, downloads and full-resolution views won't work until you enter it — so fill it in.
Step 3 — Connect in Aubora. In Settings, choose kDrive, paste the token into kDrive token, put the number in Drive ID (optional), and click Connect kDrive.
Good to know: the kDrive API is rate-limited (about 60 requests/minute), so the first full index is paced and can take a while on a big library — expected, not a stall. It runs in the background and resumes if interrupted.
pCloud — OAuth
pCloud connects by signing in through your browser (OAuth) — no token to copy.
- In Aubora, choose pCloud and click connect.
- Authorize Aubora in the browser window that opens, then return to the app.
Region is handled automatically. pCloud runs separate EU and US endpoints
(eapi.pcloud.com vs api.pcloud.com). At sign-in pCloud tells Aubora your account's region, and
Aubora uses that endpoint from then on — you never pick one, and an EU account won't hit the
classic "connects but sees no files" trap.
Sign-in grants read access only — Aubora lists and reads your photos, never writes back.
Dropbox — OAuth
Dropbox also connects by signing in through your browser (OAuth).
- In Aubora, choose Dropbox and click connect.
- Authorize Aubora in the browser, then return to the app.
Aubora requests read-only scopes (files.metadata.read, files.content.read) — it can list
and read your files, not change them. Scopes are fixed when the token is issued, so on a
permission error, reconnect for a fresh token. Tested with personal Dropbox accounts;
Business / Team accounts aren't supported in the beta — their team namespaces address files
differently, so one may not behave as described. If you try it, let us know how it goes.
Local folder
Point Aubora at a folder of photos on your Mac (including a synced/cloud-desktop folder).
Use Browse to pick one or more folders with the macOS picker. Aubora indexes each folder and all its subfolders, reading the common formats — JPEG, PNG, HEIC/HEIF, TIFF, and camera raw (DNG/RAW) — and skipping the rest.
3. Technical FAQ
Common first-run questions
kDrive connected, but downloads and full-resolution photos don't work.
You're probably missing the drive ID. Reconnect with it (the number in your kDrive URL) in the Drive ID field. Indexing and search work without it; only fetching originals needs it.
pCloud connected but I see no photos.
The EU/US region split is handled automatically, so it's usually not that. Check the folders you expect are in the account you authorized, and that you've added them under your library's Content / folders — connecting an account doesn't pick folders for you.
The gallery is all gray #id placeholders — no thumbnails.
Thumbnails are made during indexing, which needs the on-device AI models installed (download is opt-in). Install them when prompted (Settings → AI models) and let the scan run — photos fill in as they're processed.
There's a long pause after "discovering" before photos start processing.
That's the models loading on first use — the panel shows "Loading AI models…". It's once per launch; per-photo progress starts once they're warm.
My library says "No source" or "No content".
No source means no provider is connected to that library yet — open its Source to pick kDrive / pCloud / Dropbox / local. No content means a provider is connected but you haven't added any folders — open Content to add them.
macOS keeps asking for my login password or keychain access.
Aubora keeps your cloud access tokens in the macOS keychain. Choose Always Allow when prompted so it doesn't ask again.
Can I use the app while it's indexing?
Yes — photos become searchable, mappable, and grouped as the scan runs; you don't wait for it to finish. Pause and resume from the Library panel, and it resumes on its own after a restart.
Privacy and how it works
Does Aubora upload my photos anywhere?
No. Indexing and search run entirely on your Mac. The only traffic leaving your machine is to your own storage provider, to read your photos. Nothing about your library is sent to Aubora.
What actually powers the search?
Search uses CLIP image–text embeddings: each photo becomes a vector once, stored locally, and your query is matched against them on your Mac. Models run through ONNX Runtime — CPU by default, with optional GPU acceleration (CoreML) on Apple Silicon (see below); the Intel build is CPU-only.
Does Aubora change or delete anything in my storage?
No — it reads only. It never writes back to kDrive, pCloud, Dropbox, or your folder.
Indexing and disk space
Why is the first index slow, and then fast afterwards?
The first pass reads and embeds every photo — a one-time cost (paced by kDrive's rate limit there). After that, only new or changed photos are processed. Aubora picks up where it left off and asks the source only for what's changed, matching each photo by file id and content hash: unchanged is skipped, changed is re-indexed. (Local folders compare modification time and size.)
Where is the index kept, and how much space does it use?
Under ~/.aubora/libraries/default/: a SQLite database (store.db, plus its -wal / -shm
companions) for the search index, on-disk caches of display thumbnails, larger previews,
and face crops, and a one-time models/ folder. The vectors themselves are tiny — the space
is almost all image cache.
Roughly 120 MB per 1,000 photos by default (a ~9,000-photo library ≈ 1.1 GB), mostly the previews cache. See the breakdown and reclaim space under Settings → Cache — thumbnails, previews, and face crops, each with a size and a Clear button. Turning off Fast lightbox previews drops the previews cache (about three-quarters of the total), down to ~30 MB per 1,000 photos; the trade is that opening a photo then fetches the full-resolution original — crisper, but slower and re-downloaded from the cloud.
To start over: Settings → Danger zone → Reset index (type RESET to confirm), or quit Aubora
and delete ~/.aubora/libraries/default/. The next scan rebuilds it.
What happens to the original photos it downloads?
To embed a photo it fetches the original, then discards it — it never keeps a second copy of your library. What stays on disk is the search index (embeddings + coordinates) and a small downscaled thumbnail per photo, so the gallery and map stay fast without re-reading your source. The full-resolution original is never kept.
Can I move indexing to the GPU to keep my Mac responsive?
Yes, as an experiment — on Apple Silicon only. By default Aubora runs on the CPU (the supported mode); under Settings → Advanced → Acceleration you can turn on "Use GPU acceleration (CoreML) — experimental" to move the search model (CLIP) onto the GPU. The first time, it compiles the model for your GPU once — a few minutes, with a progress note, and you can keep working — then caches it so later launches are fast. (The Intel build is CPU-only: CoreML caching needs a newer runtime than Intel Macs have, so the option isn't offered there.)
It's not faster — wall-clock time is about the same. What changes is load: the CPU path pushes several cores hard, the GPU path drops to roughly one, so the rest of the Mac stays responsive and runs cooler while it works. Because compiling adds startup cost, Aubora only uses the GPU for large scans (default ≥2,000 photos, adjustable under the toggle) — smaller incremental scans stay on the CPU, where they're quick anyway. So it mainly helps your big initial import or a large re-index.
Only the search model moves; people and faces run on a separate engine, and your search results don't change (the GPU's 16-bit math is too small to affect ranking). A fresh install has the model it needs; a library carried over from a very early build may need its models refreshed first. If anything goes wrong — the compile fails, your chip computes incorrectly, or the model can't be cached — Aubora falls back to the CPU and tells you; and if results ever look off after you enable it, switch the toggle back off to return to the supported path.
Map and people
How does the map know where photos were taken?
It reads the GPS the camera saved in each photo. It also reads JSON companion files that sit next to your photos — the kind Google Takeout exports — so a location survives even when a service has stripped it from the image. Companion files in a different format? Email contact@aubora.app and we'll look at adding support.
Turning coordinates into place names is separate and off by default (Settings → Privacy, online geocoding). Switched on, Aubora looks names up from OpenStreetMap's Nominatim; the map itself — plotting photos by GPS — works fully without it.
People and faces — what's the status in the beta?
Faces are detected and grouped into people entirely on-device. On the free tier People is browse-only — look through the groups and open a person's photos; naming, merging, and splitting people come with your beta license.
Platform and licensing
Which Macs are supported? Will there be Windows, Linux, or iPhone?
Apple Silicon (M-series) is preferred — it's where the optional GPU acceleration (CoreML / Neural Engine) keeps local indexing lightest on your machine. An Intel (x86) build for older Macs is on the way; it does everything the Apple Silicon build does — indexing, search, map, people — on the CPU, just without the GPU option. Beyond macOS, nothing's planned: Windows, Linux, and mobile aren't supported and aren't on the beta roadmap.
My beta license expired or stopped working.
A beta license is time-limited but renews itself automatically while you're online. If our licensing server is unreachable, it keeps working through a 14-day grace period, so an outage on our side never locks you out. If a license genuinely expires or is revoked, you still aren't locked out — Aubora drops to the free tier, capped at 2,000 photos of your already-indexed library. Re-activate, or paste a fresh beta key, under Settings → License.
Help
Something's wrong, or I found a bug.
Email contact@aubora.app with what you did and what happened, which source you connected
(kDrive / pCloud / Dropbox / local), and the log file — a rotating log at
~/.aubora/logs/aubora.log (it keeps the few most recent). It makes almost every connect /
first-index problem diagnosable.